Portal Setup
5 min read
Portal Setup
Portal Setup is where you activate the Staff Portal and Mobile App for your site.
Use it to configure access, request controls, and notifications before you go live.
Before you start
To configure Staff Portal and Mobile App settings:
- Your Wageloch account needs full administrator access.
- Each staff member needs a unique email address on their staff card.
INFO
Each employee must have a unique email address. Shared addresses can stop logins from being set up correctly.
Open Portal Setup
- Open Wageloch and sign in.
- Click Settings (top-right).
- Select Portal/Mobile App.
- Select Portal Setup.
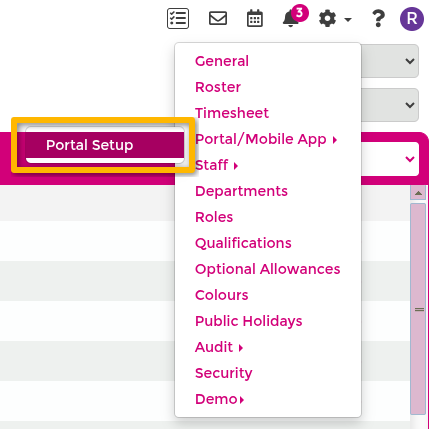
Open portal setup
Capture Settings with the Portal/Mobile App menu and Portal Setup option visible.
Security settings
Use Security to assign portal administrators and manage mobile communication settings.
- Administrative access: enable admin rights for a selected staff member or a non-staff contact.
- Shift Swap and Message Centre: let portal admins handle shift swap communication and staff messaging.
Assign an existing staff member as portal admin
- Select Yes for administrative access.
- Choose Select a Staff Member.
- Tick the staff member(s) to grant access.
- Click Next.
Assign a non-staff portal admin
- Select Yes for administrative access.
- Choose Enter a non-staff member.
- Enter first name, surname, and email address.
- Click Next.
Configure portal security and admin access
Capture the Security step showing staff and non-staff admin assignment options.
Roster visibility settings
Use Rosters to define what staff can view.
- Allow viewing rosters: if enabled, staff can view roster information in portal and app.
- View unpublished rosters: allows visibility before roster release.
- View complete roster: allows staff to see all staff roster lines, not only their own.
Configure roster visibility settings
Capture the Rosters step showing allow-roster, unpublished-roster, and complete-roster options.
Leave request settings
Use Leave to control leave-request permissions and visibility.
- Allow leave requests: lets staff submit leave requests for approval.
- Show other staff on leave: choose name visibility or count-only display.
- Allow leave overlap into published roster: permits requests after rosters are published.
- Allow backdated leave requests: permits requests for dates that have already passed.
INFO
If backdated leave is enabled, staff can request leave for past dates, and managers might need to review these manually.
Configure leave request settings
Capture the Leave step showing leave request toggles and visibility options.
Availability request settings
Use Availability to control unavailability requests.
- Allow staff to request unavailability: if enabled, staff can submit availability or unavailability for manager approval.
Configure availability request settings
Capture the Availability step with unavailability request option visible.
Email notification settings
Use Email Details to route request notifications.
- Enable request notification emails.
- Enter one or more recipient addresses (comma-separated).
- Click Next.
These addresses receive staff request notifications and outcome updates.
Configure portal email notifications
Capture Email Details showing notification toggle and recipient address field.
Daily staff notes
Use Daily Staff Notes to control staff-facing notes and communication preferences (where this feature is enabled).
Configure daily staff notes
Capture the Daily Staff Notes step showing note options available for staff communications.
Mobile app clock time alerts
Use Mobile App settings to configure clocking alerts.
- Enable clocking alerts: turn on reminders for late clock-in, late clock-out, or both.
- Tolerance: set delay before reminders send (for example 15 minutes after start time).
- Email alerts: send missed-clock reminders to manager email.
- Push notifications: send reminders to manager and/or employee app users.
INFO
Clock time alerts rely on rostered shifts. If no shift is rostered, alert logic may not trigger.
Configure mobile app clock time alerts
Capture the Mobile App step showing clocking alert types, tolerance, and notification recipients.
Site information defaults
Use Site Information to set defaults used by leave processing.
- Length of workday: default leave-day hours when template-based values are not applied.
- Start of workday: default day-start time.
- Restrict leave request: limit number of staff that can be approved off on the same day.
TIP
For more consistent leave outcomes, use Leave Templates with these defaults.
Configure site information defaults
Capture Site Information settings with workday length, start time, and leave restriction options.
Review setup confirmation
The Setup Confirmation step summarises your choices before activation.
- Use Back to adjust earlier settings.
- Click Next when configuration is correct.
Review portal setup confirmation
Capture the Setup Confirmation step showing a summary of selected settings.
Activate Staff Portal and Mobile App
Before activation, review staff with missing email addresses and update their staff cards if needed.
When ready:
- Enable the site now = Yes: activates Staff Portal and Mobile App and sends activation instructions.
- Enable the site now = No: keeps configuration saved but not active.
- Click Save Information, then Finish.
Activate staff portal and mobile app
Capture the Activate step showing enable-site option and final Save/Finish actions.
When the portal is live
When the Staff Portal is live, all staff with valid email addresses on their staff cards receive a welcome email with portal access instructions.
You can return to Portal Setup at any time to update these settings.